Tuesday, November 9, 2010
Happy Birthday, Jake!
In keeping with our new tradition of making Jake work hard on every holiday when he should be relaxing, Jake spent his birthday pulling low voltage wire throughout the house so that we can have TV, internet and phone. The combo 4 wire was pretty thick and barely fit through the smurf tubes. Jake and I worked all Saturday afternoon trying to get it from the TV cabinet to the stairwell where all the wires terminate. After the connection to the fish tape broke 4 times, all we succeeded in doing was getting the wire stuck in the smurf tube. Fortunately our great friend Bruce came and helped us out on Sunday. Between Jake and Bruce, they got the wire unstuck and ran it all the way. They also ran the rest of the wire. In the picture above, you can see all the wires hanging from the central location. In the picture below, you can see how tight the wire is in the tube coming out of the TV cabinet.
Now that all that Jake has to do is go over every day after work and turn the raw wire, below:
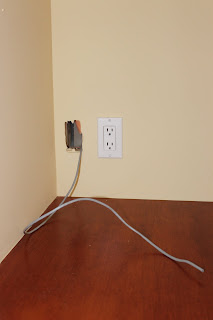
into the nice face plates:
Oh, and put in the panel, and I'm sure a few other things as well. The birthday gift that keeps on giving!
In the Closet
I have been in the closet -- literally, not metaphorically -- almost all week. I installed a great Elfa closet system in the pantry, and worked on all the other closets as well. I still have some pieces to get for Molly's closet and the master closet, but I am almost there. My mom and I went to Ikea and got some bureaus to put in the master closet to hold my clothes, since Molly is getting my good dresser. Once they are all complete, the closets are going to be great. Just look at the great picture at the top of my pantry! The picture below is of my mom after successfully constructing both dressers for the closet -- a nontrivial task to say the least!
House Tour
Since we are almost done, I thought I would do a quick house tour of how great it looks now, before we junk it up with stuff! Follow me on a tour of 124 Laurel:
The front needs some landscaping, but the front porch really made a difference. I think it looks so welcoming:
The paint in the living room is a great color. The tile guy is coming to do the fireplace this week, and I'll be sure to post some pictures when it is done:
I also like the dark green in the dining room. I think at this point, the dining room is going to be the only room in the house without books -- I'll have to think of something.
The girls are both very excited about getting their own rooms. They have each put a lot of thought into color and decoration, and the rooms will be very different. Emily picked purple on the walls, which you can see below, and Molly picked a sunny yellow with her cool chandelier. I think both rooms are going to look fantastic once we get everything in to them -- keeping them that way will be another matter!
Our bathroom and bedroom turned out really well. I love the blue in my room -- the picture doesn't quite do it justice, but it is really blue! The bathroom is simply wonderful. I love the tile that the designer chose and the way we used it as the back splash around the sinks.
My desk area is great as well. Enjoy the below picture, since it is the last time the surface of the desk will be clean! I have promised to try to keep all the flat surfaces (of which there are many) in the front of the house free of piles of stuff, but I have to have one place for piles of paper and my desk will be it. Fortunately it is out of the public area, so no one will be bothered by the piles except me and Jake.
Finally, of course, there is the kitchen and family room. Here are a few more shots of the room and the built in cabinets:
Jake and I are so happy with how the house looks. It will be a great place to live.
Table Trouble
Our beautiful table for the banquette was too high -- when you sat down it felt like it came up to your chin. The problem was that it had already been finished, and I was worried that fixing it would mess it up. Fortunately Mike, the guy from Roth Cabinets, was fantastic. After adjusting all the cabinets for us, he pulled the table apart from the bottom and cut off three inches. You can see him working on the table in the picture above. It is amazing how much difference such a small change made -- both visually and when sitting at the table. It looks great!
Saturday, October 30, 2010
Don't Fence Me In!
Now that we have passed our final, the fences came down on Wednesday. It looks so great without them, as you can see in the picture above. I remember how excited I was to see the fences in the first place, since it meant that we were really getting started, but to see them come down is even better! I have actually driven on the driveway -- amazing how the little things take on so much significance when you get to do them for the first time!
The painters have been here touching up the paint and finishing the baseboards, and the place looks really nice. The painters are coming back on Monday to paint the front door, finish a few touch up spots and paint the downspouts. Todd and Matt still need to add the base shoe around the cabinets, but the painters already stained it, so they should be able to do that on Monday. They will also hang all the doors back up then. Of course, we won't have interior door knobs until the middle of November, but that is just a small hiccup. Todd installed all of the new cabinet hardware on Thursday, which you can see in this picture:
Also, the cleaners came on Thursday. I think it was a little premature, but you should see how great the place looks. They cleaned everything (except the freezer), including the windows -- of course, it rained last night, so I only got really clean windows for two days. The picture below I took standing on the banquette, so that you can see the clean kitchen, with the clean windows right behind it.
Here is another shot of the built in bookshelves in the family room:
Tuesday, October 26, 2010
We PASSED!
We passed our final inspection on the first try -- something almost unheard of around here and very exciting for all of us. The house was like an anthill today with lots of trades bustling around to get ready for the inspection. I was there installing the last couple of light fixtures in the rooms where we redid the wiring. Molly's chandelier looks really nice in her room, although she will be the first one to know if there is an earthquake, because the pieces hanging down from the light make a musical noise when they move and they are on a flexible piece of wire, so they will sway with the house in an earthquake. I put a super cheap fixture in Emily's room, since I have her fixture on order.
Without all the stuff covering the counter tops, the kitchen is back to looking like a real kitchen. I had forgotten how beautiful the counter tops are. The dishwasher is installed and the refrigerator is on -- all that is left is to install the stove, which they will do tomorrow now that the gas is back on.
The water has been turned on as well. Jake's faucet selection, shown below, is totally awesome! The touch technology really works. As long as you leave the faucet on, you can turn it on and off by touching the top, which will make clean up with messy hands really great.
Todd finished installing all the baseboards today, and the painters are coming tomorrow to finishing painting the trim and stain the base shoe that goes around the cabinets. Todd and Matt are going to put on all the cabinet hardware tomorrow, rehang the doors and just start making it look like a house. We still won't have all the door knobs, but at least we'll have doors. I am starting to walk around the house and look at it like a house, rather than just the different parts that I have been focusing on all these months. We are all getting really excited to move in soon! I'll do a virtual tour of the house on the blog after it has all been cleaned. Next stop, finishing the casita!
Floor Show, Act 2
So, the floor guys finished the second go around. There is still a little bit of waviness in the finish, especially in the front room, as well as a few places where the stain was applied unevenly, but overall it is a vast improvement on the previous job. I like the new color as well. They took the old color and added Royal Mahogany to make it a little darker and redder. I really like the new color. It blends very well with the cabinets. In the pictures above, the top picture is the old color and the bottom picture is the new color. Not a huge difference, but just enough to make the two wood colors a little more harmonious. With such a dark floor, I'm going to need to buy stock in Swiffer!
Wednesday, October 20, 2010
How Much? How Long? The Cost of the "Little" Things
We are at that point where we need things like light fixtures, door knobs and cabinet hardware. Apparently these are all decisions that people take very seriously. As a long time Home Depot shopper, it is an eyeopening experience to start looking for things like door knobs and lighting fixtures. I'm used to swinging by Home Depot, picking up a few interior lock sets for about $30 each, coming home and installing them. Apparently that is not the way things are done, however. Since we are trying to get a look similar to that of our old interior door knobs, I am now in the custom world, where it takes three to four weeks to get a lock set and it costs an arm and an leg -- and I'm looking at the low end stuff! The high end stuff would cost all four limbs plus my first born child. The end result is that we will be moving in without door knobs on some of the doors -- at least you don't need them for the final inspection. As soon as we have them, I'll be sure to take a picture to put it on the blog.
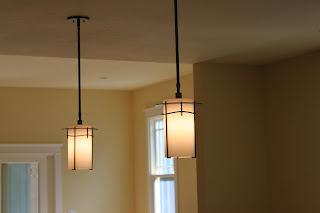
As for lighting fixtures, we were a little more on the ball with that one. You can see our pendant lights in the picture below. Of course, we still haven't gotten the light that will go over the table, but the good news is that we don't need that one for our final inspection either. It was harder than I thought to pick the pendants, and I ended up spending more than I thought I would, but I really like them. Of course, we still don't have a bedroom light for Emily's room.
I did find some cabinet hardware that I like, but I have no idea how many of the pieces the store has in stock. I'm heading back to Belmont Hardware tomorrow to get what I can of the cabinet hardware, as well as the towel racks and other stuff. Matt and Todd are hoping to install of the hardware and other stuff on Monday. Incidentally, if you live in the area and want a big selection of that kind of stuff, Belmont Hardware is definitely the place to go. Good service and a great selection!
As you can see in the picture at the top, our glass enclosure for the shower has been installed. It looks great. The shower turned out very well -- I love the tile. The electrician also finished the electrical trim out, so we have lights now. It's amazing what a difference switches and outlets make in making the house look finished. We're really getting there -- next stop, final inspection!
Floor Show
There are two sides to every story. Our floors were done about a week ago. Gary and his guys did a wonderful job with all the corners and the installation overall. After a coat of stain and two coats of urethane, however, it became clear that there was a problem with the floors. The sander they used had a bad bearing, which resulted in lines across the floor running perpendicular to the grain. So, unfortunately for the floor guys, they had to come and sand the floor again and start all over. You can really see the lines in this picture (you have to look closely in this small picture, but they run back toward the cabinet):
The good news is that the mistake gives me a chance to change the color of the floor. I really liked the original color, and I was okay with the way it looked with the cabinets, but as you can see in the picture below, there was some disharmony between the two wood colors. The new color will be even a little darker with a reddish undertone, and it looks great with the cabinets. The floor guys are going to put the stain on today, and we should be able to walk on it again by the weekend. I'll be sure to post some pictures of the new color versus the old color for comparison.
Hardscaping
Our driveway and front walk were terrible before we started construction, and the construction process made everything much worse. Our front walk ended up being completely demolished and our driveway, such as it was, suffered a lot of damage. We scraped up some money from somewhere to get some new hardscaping, and everything looks so much better now. At the same time the concrete guys installed the walkway back to the casita.
We had some challenges. Jake doesn't like the look of plain concrete, but we really couldn't afford pavers at nearly twice the cost of concrete. We compromised on the driveway by having the concrete guys put pebbles in the concrete to give it a different look. You can see how it looks in the picture below. I have to say, I am very excited about having a real driveway, with no more puddles and gravel getting everywhere.
For the front walk, we decided to do squares instead of a straight sidewalk. We hope to eventually put tile on the front porch and walkway, so that will cover up the concrete. I like having the squares instead of all sidewalk -- I like the look of the plants softening the edge of the concrete. Of course, at the moment we are pretty far away from planting! You can see the front walk on the picture at the top of the post.
For the walkway in the back, we decided to do something even more different. We didn't want a straight, solid sidewalk, since it would make the casita look farther away. We didn't want to curve the walkway because no one walks a curve -- everyone would just cut through and walk straight off the walkway. We toyed with stepping stone arrangements and came up with the pattern below. By alternating squares and rectangles and offsetting them, it gives a curved impression with a straight path down the middle. It is more interesting than practical, since the distance between the concrete pads ended up being a little too far, but I like the visual effect. We're still working on a landscaping plan -- Jake's friend Dan helped us get a good idea of what we want to do where. Looking down the path to the casita, I think most of the space between the path and the fence will end up being a planting bed.
Sunday, September 26, 2010
Getting Started on the Finishes
Well, in spite of many bumps in the road, we are almost done with the tile. The shower in our bedroom looks great. I love the cool border tile that the designer helped us pick out. I think it has a great arts and crafts look to it, and it goes really well with the field tile. The border tile is also going to be the backsplash of the bathroom vanity, with a border around it of the field tile in the shower. The shower enclosure guy also came to take the measurements of the shower to build the glass shower enclosure. You can see in the picture above how beautiful the master shower is going to be -- the tile is in but it is not grouted yet.
The tile guys, Richard and Aaron, also did a great job on the bathroom in the casita. The field tile in the shower is the color of Crema Marfield marble, which is going to be the surface of the vanity in the master bathroom, as well as the tile on the floor in the master bath. There is a darker tile on the floor of the casita bathroom, which is on the floor both of the bathroom and the shower, to make the bathroom feel bigger. (We did the same thing in the master bathroom.) I really like the border mosaic tile in the casita bathroom as well. The above picture shows the casita bathroom -- everything has been grouted but the mosaic tile in the border.
Richard also installed the tile backsplash in the kitchen, as you can see in the above picture. The tile is 3x6 crackle finish in an off white. The problem is that you can't see the crackle from a distance, but up close it looks great. We were trying to get tile that had a different dimension (3 x 9) which would have looked different and cool, but it was completely out of stock. I do like the way the backsplash looks -- and it will look even better once it has been grouted and all the stuff is off the countertops.
In addition to the tile guys, the floor guys have been hard at work. The house looks so much more finished with the wood floor in. They haven't finished it yet, but even unfinished it looks awesome! They are going to sand all the old floor and refinish it too, so the whole thing will be the same color. I think we are going to go a little darker on the floor, to give it a more modern feel. The picture right below shows the great room with the new wood floor.
We paid extra to have the floor in all the rooms given a wood border to match the rooms in the old part of the house. You can see in the picture below how great the borders look. They had to go around the island, the banquette and all around the hall, but it looks so good. I am really glad that we decided to do the border.
Thursday, September 16, 2010
Color Anyone?
We have been working overtime to paint the house, along side our painters. After much angst, we painted the front two rooms two shades of green -- the dining room is a dark green and the living room is a medium green. You can see the two shades in this picture:
The painters painted the new part of the house. After about 12 samples of color, I finally chose a yellowish color. Every time I go into the house I like it more. I think it is bright and really makes the family room and kitchen look nice. It goes quite well with the cabinet color as well. You can see the color against the cabinets here:
Our latest color issue is the color of the trellises. As you can see in the pictures below, they are next to the green and brown of the porches. So, should be paint them green or brown? If you have an opinion, just email me so that I can add your input to my continuing obsession over color. Next week, obsessing over the color of grout!
Tuesday, September 7, 2010
Trellises
Todd, Matt and Jim worked together on Thursday and Friday to build the trellises over the kitchen window and the windows and doors in the master bedroom. They add some nice character to the house -- they are very in keeping with the style and do in fact help shade the windows. Of course, now I have to paint them, which will take awhile since they have so many nooks and crannies. I will definitely have lots of practice painting when this remodel is over!
A Very Laborious Labor Day
Obviously we didn't get the memo that Labor Day was supposed to be a day off. We spent the whole weekend working on the front two rooms. On Saturday, we fixed all the holes, sanded the spackle, tsped the walls and got it all ready to paint. We then spent the next two days painting the walls and ceilings. The painter told us to put 25% of the color that is going on the walls on the ceiling, so Saturday we painted the ceilings light green. I have to admit that I was totally freaking out at how green the ceilings looked when we went home on Saturday night. It was totally awesome how once we painted the walls, the ceilings looked white! We are going to do that in the rest of the house too, because adding a little color to the ceiling makes it look much less stark against the walls and gives the optical illusion of white ceilings. By the end of the weekend, we got both the dining room and the living room painted -- both of them are green, with the dining room really dark. The best part is that the whole family worked on the paint! The girls were actually a really big help.
Subscribe to:
Posts (Atom)